Plesk website setup

Add a new domain to your Plesk hosting

Create a separate website space for a domain that your UKC hosting plan can accommodate. Add the domain before changing live DNS so you can prepare its files, PHP settings and certificate safely.

Choose the right objectA domain hosts a separate site; an alias shows an existing site; a subdomain is part of a domain.

Add it in Plesk firstPrepare the hosting space before sending public traffic to the server.

Verify before launchCheck files, DNS, email routing and HTTPS after the change.

Before you begin

Domain, alias or subdomain?

New domainUse this for a separate website with its own document root and hosting settings.

Domain aliasUse this when another domain should display or redirect to an existing website.

SubdomainUse this for a hostname such as shop.example.com. Follow the subdomain guide.

Adding a domain in Plesk does not register it.

The domain must already be registered. Your hosting plan must also permit another hosted domain; if the Add Domain option is unavailable, check the plan or contact support.

Protect existing services

Record the current DNS and email route

Before changing nameservers or A records, save the existing DNS records, especially MX, TXT, SPF, DKIM and verification records. A website move does not require email to move at the same time.

Plesk steps

Create the hosting space

1

Log in to PleskUse the “Log in to Plesk” action for the correct hosting service in your Client Area.

2

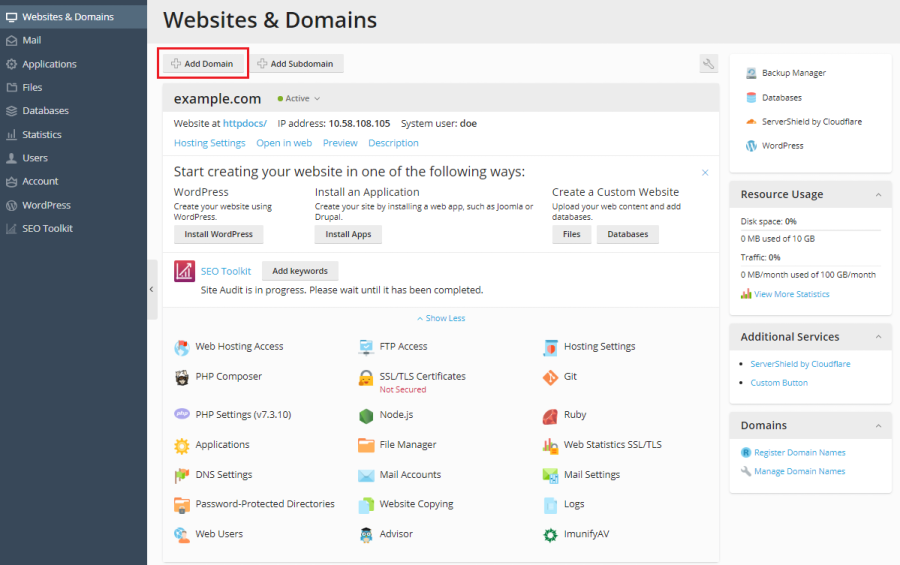
Open Websites & DomainsSelect Add Domain. Plesk may first ask what kind of site you want to create.

3

Enter the domain nameUse the bare name, such as example.com, without www or a URL path.

4

Choose a document rootKeep a distinct root for a separate website. Avoid pointing two unrelated domains at the same files.

5

Create the domainWait for Plesk to finish, then open its Hosting Settings and confirm PHP support and the preferred domain.

Website content

Upload or build the site before launch

Upload files through File Manager or SFTP, install WordPress from the Plesk toolkit, or use Sitejet where your plan provides it. Confirm the correct document root before importing an existing website.

Go live

Connect the domain to this server

Use the nameservers or DNS records shown for your hosting service. If DNS remains with another provider, update the website A/AAAA records there and retain the required email records. DNS changes can take time to reach every resolver.

For record-level changes, see manage DNS records in Plesk.

HTTPS

Issue the certificate after DNS resolves

Once the domain and www resolve to the hosting server, use Plesk’s SSL/TLS or Let’s Encrypt tool to issue a certificate. Include every hostname visitors will use, then enable the HTTPS redirect only after the certificate works.

Final checks

Test the service from a visitor’s point of view

  • Open the domain and www over HTTPS in a private window.
  • Confirm the expected site loads and internal links do not point to a temporary address.
  • Test forms and application logins.
  • Check that email still reaches the intended provider.
  • Review Plesk logs if the site displays an error.

Need help?

Tell us what stage failed

Include the domain, the UKC hosting service, whether Add Domain is visible, where DNS is managed, the exact error and whether existing email must remain unchanged.

Domain will not add or resolve?Open a support ticket with those details. Do not send your Plesk password.

Open a support ticket

Was this answer helpful?

« Back