
To set up your first website, you need to follow these steps:
- Register a domain name.
- Add a domain in Plesk.
- Create your website.
Registering a Domain Name
Think of the domain name as your business’ address. Your customers will use it to find you online, so make sure it is a good one. The best domain names are short, easy to type, and easy to remember. An example of a domain name is example.com. Registering a domain name can be done through one of the many organizations called domain registrars. Your hosting provider will usually be able to assist you in registering a domain name as well. Web hosting services are often bundled with domain name registration offers, and vice versa.
Note: If you are a web hosting customer, make sure that when registering a domain name through your hosting provider, it is registered in your name. Otherwise, you may have trouble if you decide to change your hosting provider in the future.
Adding a Domain in Plesk
If you are a web hosting customer, your provider has probably already added your first domain for you. If they have not, contact your provider. If you are a web admin using the Power User view, you have configured your first subscription during the initial Plesk setup. Adding a domain in Plesk enables you to upload content, use Presence Builder, or install a content management system.
In the future, you will be able to add more domains, but for the purpose of this section, your first domain will suffice.
Creating Your Website
There are three ways to create the content for your website. Each has its advantages and disadvantages. Here is a short summary of all three:
- Employ a professional designer and upload content. This option guarantees you will get exactly what you want. However, it is also the most expensive one. The web designer will provide you with the files you will need to upload to your hosting account. You can do it using FTP or File Manager. To learn how to do it, click here.
- Use Presence Builder. The Presence Builder tool that comes bundled with Plesk enables you to create websites using a web interface. You can use one of the provided templates to create a professional-looking website in a matter of minutes. To learn how to do it, click here.
- Use a content management system. Content management systems (CMS for short) are third-party applications that enable you to create and maintain a website. They are highly versatile, and come with a large number of optional add-ons. CMS offer a greater degree of customization as compared to Presence Builder but demand more technical knowledge from the user. To learn how to use a CMS, click here.
Option A. Upload Content
If you have coded your website yourself, or employed a web designer to do it for you, you need to upload the website content to Plesk before the website becomes available on the Internet. Plesk gives you the option to upload content either using FTP or File Manager. The instructions below explain how to do both - choose which option works best for you.
To publish a website using FTP:
- Download an FTP client program. You can choose any FTP client you like. If you do not know what FTP client to choose, you can use FileZilla:
- You can download FileZilla here: https://filezilla-project.org/download.php?type=client
- You can find FileZilla documentation here: https://wiki.filezilla-project.org/Documentation
- Connect to your subscription on the server using the FTP client. To connect, you need the following information:
- FTP server address. The FTP address should be ftp://your-domain-name.com, where your-domain-name.com is your site’s Internet address.
- FTP username. This is identical to your system user name. Note that the system user name may differ from the username that you use for logging in to Plesk. To find what your system user name is, open the Websites & Domains tab and click Web Hosting Access. You will find it under Username. You can change your system user name if you wish.
- FTP password. This is identical to your system user password. If you do not know what your system user password is, open the Websites & Domains tab and click Web Hosting Access. You can reset the password under Password.
- Switch on the passive mode if you are behind a firewall. Refer to your FTP client documentation to learn how to enter the passive mode.
- Upload the files and directories of your site to the
httpdocsdirectory. If you use CGI scripts, place them in thecgi-bindirectory.
To publish a website using File Manager:
-
Go to Websites & Domains > domain name > File Manager and go to the
httpdocsdirectory. -
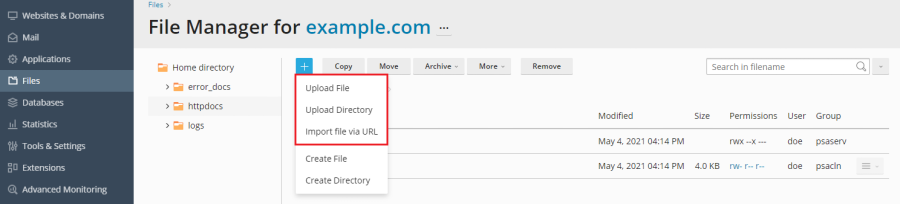
Click the
 button and then do the following:
-
To upload a single file, click Upload File, locate, and then select the file you want to upload.
-
To upload a single file, multiple files, or a directory with the files therein, click Upload Directory and then drag files or directories to the dashed line box.
-
To upload a file not from your computer but from another website or FTP server, click Import file via URL, specify the the URL of the file, and then click Import. For example, the URL can be
https://example.com/image.pngorftps://user:password@example.com/example.tar.Note: File Manager supports the following protocols for file import: HTTP, HTTPS, FTP, and FTPS. Depending on the protocol, the user name and password in the URL path can be either optional or mandatory.
You have uploaded the file. If it was an archive, you have two more steps left.
-
-
Click the row corresponding to the archive and then click Extract Files. If the directory contains files whose names match those packed in the archive, select the “Replace existing files” checkbox. The unpacked files will then replace those in the directory.
-
Click OK.
Note: File Manager can extract files from the following archive formats: ZIP, RAR, TAR, TGZ, and TAR.GZ.
It is possible that the website you have uploaded requires a database to function. Learn how to create a database.
Option B. Create your Website in Presence Builder
To create a website using Presence Builder, go to Websites & Domains> Presence Builder and click Create Site.
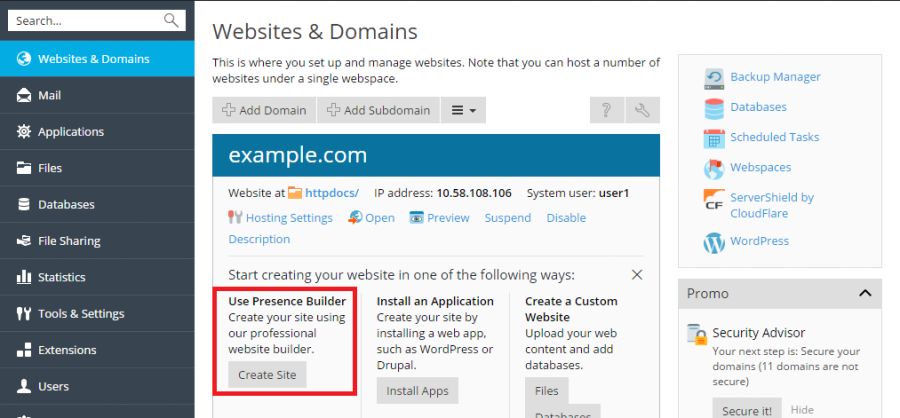
Find more information on creating and editing websites in Presence Builder athttp://docs.plesk.com/current/customer-guide/.
Creating your website in Presence Builder means that you do not need a database. Proceed to the next step to learn how to create a mail account in Plesk.
Option C. Install a Content Management System
To create a website using a Content Management System (or CMS), go to Applications > Install.
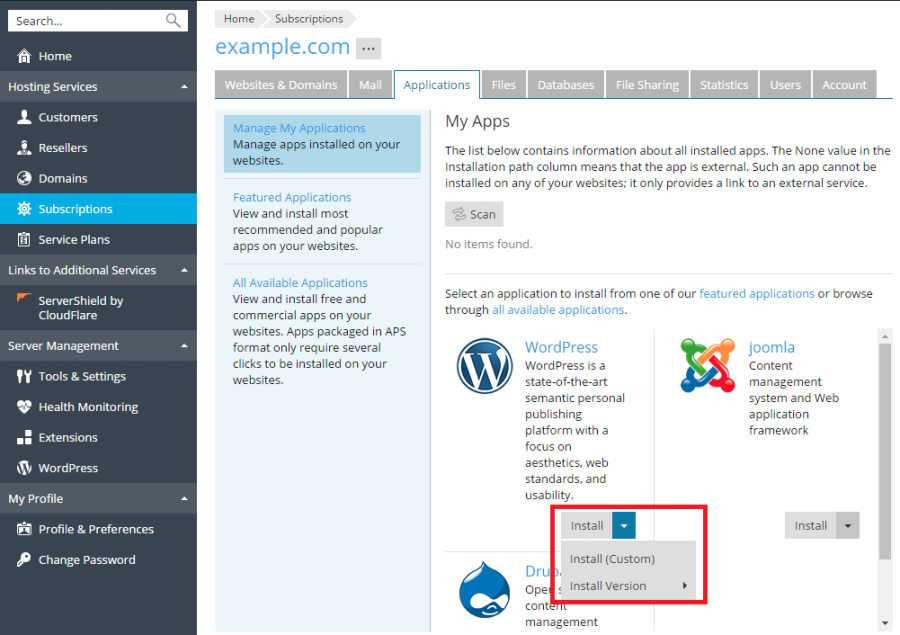
Note that installing a CMS following the instructions above means that a database will be created for your website automatically. Proceed to the next step to learn how to create a mail account in Plesk.